The Project
CyberLab is a physical cybersecurity homelab I use to get hands-on experience with network security, firewall configuration, IDS/IPS, SIEM, and offensive and defensive exercises. Unlike the rest of my portfolio, it is not a software project. It is hardware, cabling, and a design that has to survive contact with real packets.
What is currently live is v2. The whole thing was rebuilt after v1 because the original design had no upfront IP plan, ad-hoc firewall rules, and documentation written after the fact. That turned out to be slower to refactor than to rebuild cleanly, which is the single biggest lesson the lab has taught me so far.
Topology
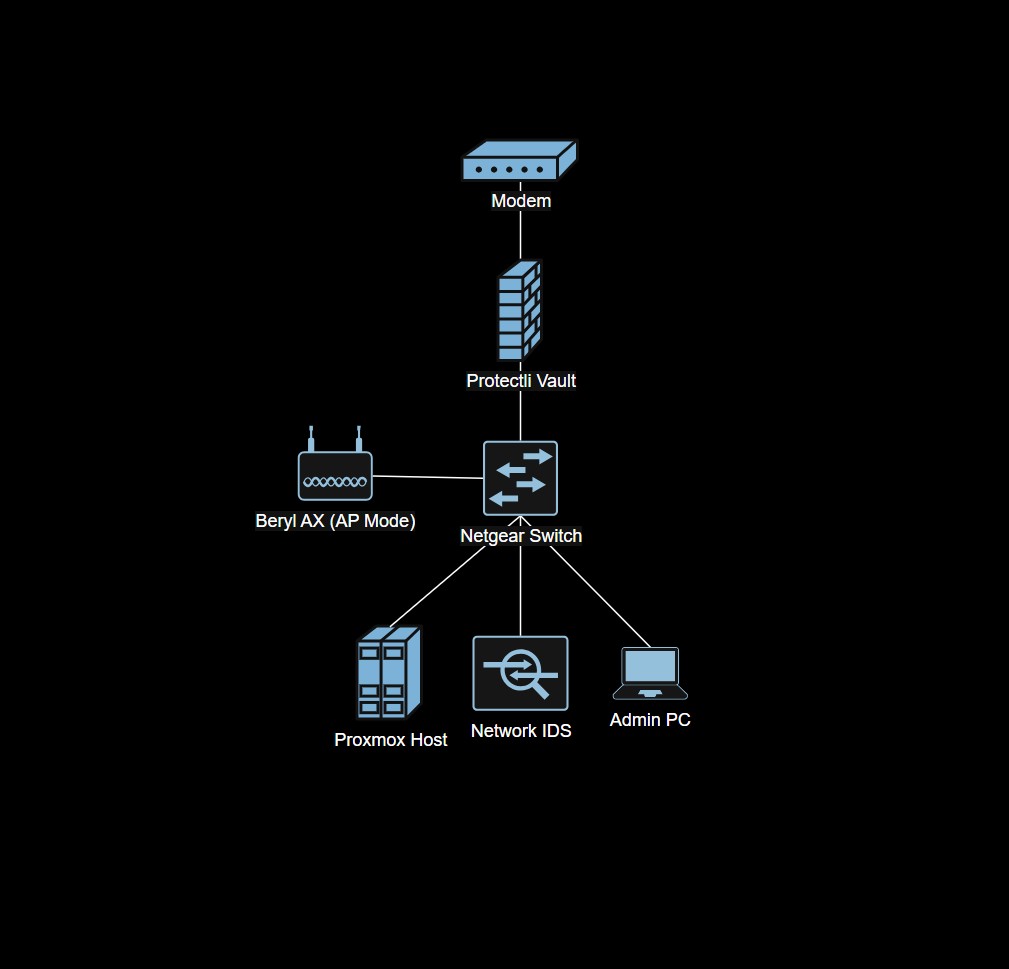
Hardware
| Device | Model | Role |
|---|---|---|
| Firewall | Protectli Vault | pfSense (bare metal), WAN/LAN, VLAN enforcement |
| Managed switch | NETGEAR GS308EP | VLAN tagging and port mirroring to the IDS sensor |
| Virtualization host | Dell laptop (repurposed) | Proxmox hypervisor for all lab VMs |
| IDS sensor | Raspberry Pi (Ubuntu 24.04) | Suricata + Zeek reading the mirrored port |
| Admin workstation | Dell laptop | Config and management |
Network Segmentation
The v2 rebuild started with a written IP plan before any hardware was touched. Three VLANs keep management, user, and lab traffic on separate broadcast domains, each with its own DHCP scope and its own set of firewall rules on pfSense.
| Network | VLAN | Subnet | Purpose |
|---|---|---|---|
| Management | 10 | 10.27.10.0/24 | Firewall, Proxmox, monitoring |
| User | 20 | 10.27.20.0/24 | Client access |
| Lab | 30 | 10.27.30.0/24 | Vulnerable VMs, pen-testing targets, offensive tooling |
Security Stack
| Tool | Role | Platform |
|---|---|---|
| pfSense | Firewall, routing, VLAN enforcement | Protectli Vault |
| Suricata v7 | Signature-based network IDS (ET SCAN rules, 48k+ signatures) | Raspberry Pi (mirror port) |
| Zeek v8 | Behavioral IDS, protocol metadata, Intel Framework | Raspberry Pi (mirror port) |
| ELK Stack | Log aggregation, search, dashboards (in progress) | Proxmox VM |
| Tailscale | Mesh VPN for remote lab access | pfSense + endpoints |
| Kali Linux | Attacker VM for offensive exercises | Proxmox VM |
| OWASP Juice Shop | Intentionally vulnerable web target | Proxmox VM |
IDS Sensor Detail
The NETGEAR switch mirrors all ports to the Raspberry Pi port. On the Pi, NIC offloading is disabled and the interface runs in promiscuous mode so the sensor actually sees every packet, not the kernel-assisted summary.
Suricata runs as a systemd service with signature-based detection and active ET SCAN rules. Zeek runs alongside it with JSON logging, the Intel Framework loaded against a malicious-IP feed, and Community ID enabled so events from Suricata and Zeek can be correlated in the SIEM.
Build Order
- Network architecture: physical and logical layout on paper first.
- IP schemes: VLAN tags, subnets, and gateway addresses decided before any device is plugged in.
- pfSense firewall: base install on the Protectli, WAN/LAN bring-up, initial rules.
- Proxmox virtualization host and the first set of lab VMs.
- VLAN segmentation on both pfSense and the managed switch, with connectivity and isolation tests between each VLAN.
- Security hardening: IDS sensor deployment, port mirroring, SIEM pipeline.
- Labs and exercises: Kali versus the lab VLAN, traffic capture, alert review.
Key Decisions
- pfSense on a Protectli Vault instead of a consumer router. Enterprise-grade firewall features, first-class VLAN support, and proper rule ordering and state tracking. The v1 build ran on a flashed travel router and VLAN support alone was reason enough to replace it.
- Raspberry Pi as a dedicated IDS sensor on a mirror port. Cheap, low power, runs continuously, and sees the full network without being in the data path.
- Suricata and Zeek together, not either-or. Suricata gives signature alerts, Zeek gives behavioral logs and protocol metadata, and Community ID links events between them inside the SIEM.
- Rebuild instead of refactor. Refactoring v1 would have taken longer than a clean v2 rebuild, and the rebuild forced the IP and documentation discipline I was missing the first time.
- Document alongside implementation. v1 post-hoc documentation left gaps; v2 docs are written step by step during setup.
Status
v2 is the active build. pfSense, the managed switch VLANs, Proxmox, and the Raspberry Pi IDS sensor are all operational. Tailscale is configured for remote access. ELK Stack is in progress. Wazuh was part of v1 and has been dropped from v2 for now, though I may revisit it. The Proxmox host runs OWASP Juice Shop plus a Kali VM and a few other targets that I bring up as I need them.
The longer-term plan is to keep adding lab exercises that exercise the full detection pipeline: Kali reaches a lab VLAN target, Suricata alerts on the ET SCAN, Zeek logs the protocol metadata, and the event lands in ELK for review.
Lessons Learned
- Upfront network planning (IPs, VLANs, trust boundaries) is the single biggest lever on how maintainable the lab is later.
- Document while you configure, not after.
- Network segmentation makes both security and troubleshooting easier, not harder.
- Rebuilding a poorly planned design is often faster than refactoring it.
- Verification steps (connectivity tests, firewall rule checks, interface checks) catch misconfigs early, when they are cheap to fix.